Contrast Control for Palladium Printing Using Sodium Hexachloroplatinate
A serial dilution is a series of stepwise dilutions of a substance in solution. Usually the dilution factor at each step is constant, resulting in a geometric progression of the concentration in a logarithmic fashion. Serial dilutions are used to accurately create highly diluted solutions as well as solutions for experiments resulting in concentration curves with a logarithmic scale. The source of dilution material (solute) for each step comes from the diluted material of the previous dilution step. In a serial dilution the total dilution factor at any point is the product of the individual dilution factors in each step leading up to it.
The use of sodium hexachloroplatinate (Na2PtCl6), commonly (though unfortunately in my opinion) referred to as “Na2”, as a contrast control agent in palladium printing, was reintroduced ca. 2000 by Richard Sullivan of Bostick & Sullivan. It was quickly adopted by myself and several other printers as an alternative to the standard methods using potassium chlorate in the sensitizer (aka the A:B or ratio method) and sodium dichromate added to Potassium Oxalate developer. Over the last decade or so it has become the preferred method of many Pt/Pd printers.
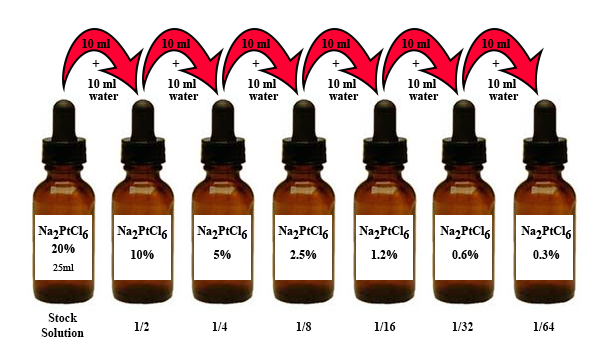
To make a working set of “Na2” dilutions for palladium printing, begin with a bottle of 20% “Na2” sodium hexachloroplatinate solution as sold by Bostick & Sullivan. You also need distilled water, 4-6 additional 1oz dropper bottles (if you never print smaller than 8×10 you can probably do without the 2 weakest dilutions, 0.6% and 0.3%), and a means of transferring a measured amount of solution from one bottle to the next. This can be pipettes, syringes, or small graduated cylinders. I like to use plastic pipettes for this as well as for preparing my coating mixtures.
- Label your empty bottles 10%, 5%, 2.5%, 1.25%, 0.625%, and 0.3125%, and remove the droppers.
- With pipette or syringe take 10ml (or whatever quantity you choose) from your 20% stock solution and transfer to the empty 10% bottle.
- With another pipette or syringe add an equal quantity of distilled water to that bottle and mix. You have now diluted your 20% solution by half to make a 10% solution.
- Transfer 10ml of the 10% dilution that you just made to the 5% bottle, and add 10ml distilled water.
- Transfer 10ml of the 5% dilution to the 2.5% bottle and add 10ml of distilled water.
- Transfer 10ml of the 2.5% dilution to the 1.25% bottle and add 10ml of distilled water.
- Transfer 10ml of the 1.25% dilution to the 0.625% bottle and add 10ml of distilled water.
- Transfer 10ml of the 0.625% dilution to the 0.3125% bottle and add 10ml of distilled water.
- Note that you now have 15ml remaining of your original 20% solution; 10ml of your 10%, 5%, 2.5%, 1.25%, and 0.625% dilutions; and 20ml of your final 0.3125% dilution.
Also note that in the illustration below I rounded the % to the nearest 10th of a percent.

